【Android】Buttonが常に最前面に来る問題を回避してボタンに画像を重ねる
POSTED BY
2025-07-12
2025-07-12


単純なものならButtonにdrawableLeft等を指定すればよいが、複雑なカスタムボタンはFrameLayoutやRelativeLayoutを使ってButtonにImageViewを重ねてレイアウトすることがよくある。
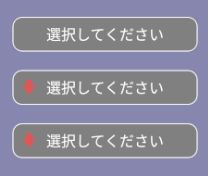
画像の一番上のボタンは以下のようにレイアウトしている。
| XML | layout/arrow_button_under_api21.xml | GitHub Source |
<?xml version="1.0" encoding="utf-8"?>
<RelativeLayout xmlns:android="http://schemas.android.com/apk/res/android"
    android:id="@+id/arrow_button_under_api21"
    android:layout_width="wrap_content"
    android:layout_height="wrap_content"
    android:layout_gravity="center">

    <Button
        android:id="@+id/arrow_button_under_api21_button"
        android:layout_width="200dp"
        android:layout_height="wrap_content"
        android:background="@drawable/round_gray_w"
        android:gravity="center"
        android:minWidth="0dp"
        android:minHeight="0dp"
        android:padding="8dp"
        android:text="選択してください"
        android:textColor="@color/white"
        android:textSize="16dp" />

    <ImageView
        android:layout_width="16dp"
        android:layout_height="16dp"
        android:layout_centerVertical="true"
        android:layout_marginLeft="10dp"
        android:src="@drawable/arrow_down" />
</RelativeLayout>
RelativeLayoutを使ってButtonの次にImageを重ねているのにもかかわらず、Imageが表示されていない。これはAPI LEVEL 21 = Lolipop 以上の時に起きる現象で、それ未満の場合は2番目のボタンのように正常にImageが左に出現する。
Lolipop以上の場合、Buttonに
android:stateListAnimator="@null"
を指定(影を無効にする)すれば、2番目のボタンのようにImageがちゃんと表示される。
| XML | layout/arrow_button_after_api21.xml | GitHub Source |
<?xml version="1.0" encoding="utf-8"?>
<RelativeLayout xmlns:android="http://schemas.android.com/apk/res/android"
    android:id="@+id/arrow_button_after_api21"
    android:layout_width="wrap_content"
    android:layout_height="wrap_content"
    android:layout_gravity="center">

    <Button
        android:id="@+id/arrow_button_after_api21_button"
        android:layout_width="200dp"
        android:layout_height="wrap_content"
        android:background="@drawable/round_gray_w"
        android:gravity="center"
        android:minWidth="0dp"
        android:minHeight="0dp"
        android:padding="8dp"
        android:stateListAnimator="@null"
        android:text="選択してください"
        android:textColor="@color/white"
        android:textSize="16dp" />

    <ImageView
        android:layout_width="16dp"
        android:layout_height="16dp"
        android:layout_centerVertical="true"
        android:layout_marginLeft="10dp"
        android:src="@drawable/arrow_down" />
</RelativeLayout>
しかしこの命令はLolipop以降にしか存在しないため、minSdkVersion が 21未満の端末で実行しようとすると落ちる。よって21未満をサポートするならXMLでなくコードでバージョンにより処理を入れる必要があるが、setContentViewした後では効かない場合があり現実的ではない。
Button button = (Button)findViewById( R.id.button );
if( Build.VERSION.SDK_INT

なのでここからが本題だが、上記問題いずれにも対応するには、Buttonを使わずにTextViewとselectorの組み合わせでボタンを作ってしまえばよい。それが画像の一番下のボタンである。以下のように作成する。
| XML | layout/arrow_button.xml | GitHub Source |
<?xml version="1.0" encoding="utf-8"?>
<RelativeLayout xmlns:android="http://schemas.android.com/apk/res/android"
    android:id="@+id/arrow_button"
    android:layout_width="wrap_content"
    android:layout_height="wrap_content"
    android:layout_gravity="center"
    android:background="@drawable/selector_round_gray_w"
    android:clickable="true">

    <TextView
        android:layout_width="200dp"
        android:layout_height="wrap_content"
        android:gravity="center"
        android:padding="8dp"
        android:text="選択してください"
        android:textColor="@drawable/selector_color_black"
        android:textSize="16dp" />

    <ImageView
        android:layout_width="16dp"
        android:layout_height="16dp"
        android:layout_centerVertical="true"
        android:layout_marginLeft="10dp"
        android:src="@drawable/arrow_down" />
</RelativeLayout>
RelativeLayoutをclickableにしてselectorをbackgroundに作成。ButtonでなくTextViewにして、textColorをクリックに合わせて変えるselectorを作成。
| XML | drawable/selector_round_gray_w.xml | GitHub Source |
<?xml version="1.0" encoding="utf-8"?>
<selector xmlns:android="http://schemas.android.com/apk/res/android">
    <item android:state_pressed="true">
        <shape xmlns:android="http://schemas.android.com/apk/res/android">
            <corners android:radius="10dp" />
            <solid android:color="@color/white" />
            <stroke android:width="1.5px" android:color="@color/white" />
        </shape>
    </item>
    <item android:state_pressed="false">
        <shape xmlns:android="http://schemas.android.com/apk/res/android">
            <corners android:radius="10dp" />
            <solid android:color="@color/gray" />
            <stroke android:width="1.5px" android:color="@color/white" />
        </shape>
    </item>
</selector>
| XML | drawable/selector_color_black.xml | GitHub Source |
<?xml version="1.0" encoding="utf-8"?>
<selector xmlns:android="http://schemas.android.com/apk/res/android">
    <item android:color="@color/black" android:state_pressed="true" />
    <item android:color="@color/white" android:state_pressed="false" />
</selector>
| XML | values/colors.xml | GitHub Source |
<?xml version="1.0" encoding="utf-8"?>
<resources>
    <color name="black">#000000</color>
    <color name="white">#ffffff</color>
    <color name="red">#c44857</color>
    <color name="pink">#e59087</color>
    <color name="green">#77acae</color>
    <color name="blue">#8686af</color>
    <color name="aquamarine">#7fffd4</color>
    <color name="palegreen">#98fb98</color>
    <color name="lightyellow">#f7efdb</color>
    <color name="yellow">#dcb654</color>
    <color name="darkyellow">#b8b05d</color>
    <color name="lightgray">#999999</color>
    <color name="gray">#808080</color>
    <color name="trans">#00ffffff</color>
    <color name="whitetrans">#99ffffff</color>
    <color name="blacktrans">#aa000000</color>
</resources>
drawable/arrow_down.png <img src="images/arrow_down.png" alt="drawable/arrow_down.png">
ポイントはTextViewのtextColorに指定するselectorは色のみを指定する訳なのでitem android:colorが必須であり、RelativeLayoutのbackgroundに指定するselectorは塗りつぶしを指定する訳なのでitem android:drawableもしくはsolidが必須である。
これでこのボタンは、タップした時に背景が白く、テキストが黒くハイライトするボタンとなる。
Android
iPhone/iPad
Flutter
MacOS
Windows
Debian
Ubuntu
CentOS
FreeBSD
RaspberryPI
HTML/CSS
C/C++
PHP
Java
JavaScript
Node.js
Swift
Python
MatLab
Amazon/AWS
CORESERVER
Google
仮想通貨
LINE
OpenAI/ChatGPT
IBM Watson
Microsoft Azure
Xcode
VMware
MySQL
PostgreSQL
Redis
Groonga
Git/GitHub
Apache
nginx
Postfix
SendGrid
Hackintosh
Hardware
Fate/Grand Order
ウマ娘
将棋
ドラレコ
※本記事は当サイト管理人の個人的な備忘録です。本記事の参照又は付随ソースコード利用後にいかなる損害が発生しても当サイト及び管理人は一切責任を負いません。
※本記事内容の無断転載を禁じます。
※本記事内容の無断転載を禁じます。
【WEBMASTER/管理人】
自営業プログラマーです。お仕事ください!ご連絡は以下アドレスまでお願いします★
【キーワード検索】
【最近の記事】【全部の記事】
キーボードで直接入力したテキストを音声合成しOBS Studioで配信するマイクで喋った日本語をテキスト変換+音声合成しOBS Studioで配信する
マイクで喋った日本語をテキスト変換してOBS Studioにリアルタイムで表示する【3】
マイクで喋った日本語をテキスト変換してOBS Studioにリアルタイムで表示する【2】
マイクで喋った日本語をテキスト変換してOBS Studioにリアルタイムで表示する【1】
Raspberry PI 2 bookworm 32bitでCanon IP4300プリンタ印刷する
【VMware】Apple silicon M2 MacでWindows11を無償で動かす
A4用紙タテ2ページ分をA3用紙ヨコ1ページに印刷するには
【Android】apkのインストールができたのにアプリ一覧に出ない場合
【Node.js】chrono-nodeを使用して自然言語を日付に変換する
【人気の記事】【全部の記事】
進研ゼミチャレンジタッチをAndroid端末化する【Windows10】リモートデスクトップ間のコピー&ペーストができなくなった場合の対処法
Windows11+WSL2でUbuntuを使う【2】ブリッジ接続+固定IPの設定
Androidホームで左にスワイプすると出てくるニュース共を一切表示させない方法
【Apache】サーバーに同時接続可能なクライアント数を調整する
CUDA13環境下でGPU使用版のPyTorchを導入する
【Linux共通】プロキシサーバーの利用設定
Debian 10 Busterに/etc/rc.localを導入する
Googleファミリーリンクで子供の端末の現在地がエラーで取得できない場合
Node.jsからPostgreSQLサーバに接続・操作する
【カテゴリーリンク】
Android
iPhone/iPad
Flutter
MacOS
Windows
Debian
Ubuntu
CentOS
FreeBSD
RaspberryPI
HTML/CSS
C/C++
PHP
Java
JavaScript
Node.js
Swift
Python
MatLab
Amazon/AWS
CORESERVER
Google
仮想通貨
LINE
OpenAI/ChatGPT
IBM Watson
Microsoft Azure
Xcode
VMware
MySQL
PostgreSQL
Redis
Groonga
Git/GitHub
Apache
nginx
Postfix
SendGrid
Hackintosh
Hardware
Fate/Grand Order
ウマ娘
将棋
ドラレコ