2025-09-27


ラズベリーパイの用途で定番化している、LED基盤を装着し光らせる(いわゆるLチカ)のメモ。
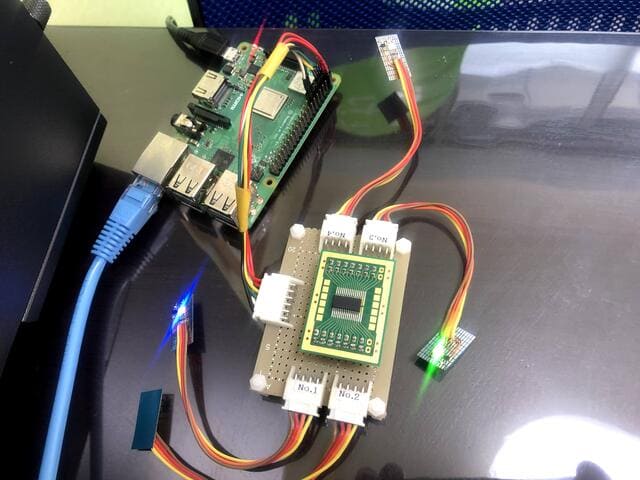
今回利用したLED基盤はこちら。制御ボードY59116Fに4つのLEDランプが装着されている。
https://www.tij.co.jp/product/jp/TLC59116F
2本の赤コードをマイクロSD側のGPIO末端(矢印のついているほうはHDMI側)にそれぞれ刺し、その後ろに残る5本の端子を、緑を先頭に刺す。

今回使用したRaspberry PIは3B+、Raspberry Pi OS Lite 2021-05-07版。
GPIOを介したI2C制御信号で制御するので、raspi-configでI2Cを有効にする。
sudo -s
raspi-config

Advanced Settings -> P5 I2C を Enebledにする。

再起動
必要なソフトウェアのインストール
sudo -s

apt install i2c-tools libi2c-dev python3-rpi.gpio python3-dev python3-pip

pip install smbus
I2C-LED基盤を認識しているかチェック
sudo -s

i2cdetect -y 1

     0  1  2  3  4  5  6  7  8  9  a  b  c  d  e  f
00:          -- -- -- -- -- -- -- -- -- -- -- -- --
10: -- -- -- -- -- -- -- -- -- -- -- -- -- -- -- --
20: -- -- -- -- -- -- -- -- -- -- -- -- -- -- -- --
30: -- -- -- -- -- -- -- -- -- -- -- -- -- -- -- --
40: -- -- -- -- -- -- -- -- -- -- -- -- -- -- -- --
50: -- -- -- -- -- -- -- -- -- -- -- -- -- -- -- --
60: 60 -- -- -- -- -- -- -- 68 -- -- 6b -- -- -- --
70: -- -- -- -- -- -- -- --
0x60番が存在していればOK。この60番にI2Cコマンドを送ることで、LEDがついたり消えたりする。
最初はSleep状態なので、以下初期化コマンドを送信してWake UPさせる。
i2cset -y 1 0x60 0x00 0x00
各ランプのON/OFF
0x14がLED1、0x17がLED4。これに0xFFを書き込むとランプON(=輝度が設定されていれば光る)、0X00を書き込むとランプOFF。
i2cset -y 1 0x60 0x14 0xff #led 1 on
i2cset -y 1 0x60 0x15 0xff #led 2 on
i2cset -y 1 0x60 0x16 0xff #led 3 on
i2cset -y 1 0x60 0x17 0xff #led 4 on
各ランプの輝度の設定
上記で各ランプをONしても、輝度を設定していないとゼロ(未点灯)なので、輝度を自由に設定する。
紛らわしいのは、RGBの並びではなく、BRGの並びであるということ。0x02がLED1のB(ブルー)ランプ、0x10がLED4のG(グリーン)ランプ。全12の輝度設定。(RGB×LED4個=12)。
0x00で輝度ゼロ(消灯)、0xFFで輝度マックス。マックスは目がやられるレベルで眩しいので注意。
i2cset -y 1 0x60 0x02 0xff #led 1 B 輝度MAX
i2cset -y 1 0x60 0x03 0xff #led 1 R 輝度MAX
i2cset -y 1 0x60 0x04 0xff #led 1 G 輝度MAX

i2cset -y 1 0x60 0x06 0xff #led 2 B 輝度MAX
i2cset -y 1 0x60 0x07 0xff #led 2 R 輝度MAX
i2cset -y 1 0x60 0x08 0xff #led 2 G 輝度MAX

i2cset -y 1 0x60 0x0a 0xff #led 3 B 輝度MAX
i2cset -y 1 0x60 0x0b 0xff #led 3 R 輝度MAX
i2cset -y 1 0x60 0x0c 0xff #led 3 G 輝度MAX

i2cset -y 1 0x60 0x0e 0xff #led 4 B 輝度MAX
i2cset -y 1 0x60 0x0f 0xff #led 4 R 輝度MAX
i2cset -y 1 0x60 0x10 0xff #led 4 G 輝度MAX
点滅させるには、これらコマンドを組み合わせて自動で打たせればよい。I2Cは、Pythonと、C言語のインタフェースが用意されている。まずはPythonで書いてみる。
| Python | i2c-led-blink.py | GitHub Source |
import smbus
import time

count = 0

i2c = smbus.SMBus(1)
addr = 0x60

i2c.write_byte_data(addr, 0x00, 0x00) #ALL LED INIT

i2c.write_byte_data(addr, 0x17, 0xff) #LED4 ON

while True:
  if count % 2 == 0:
    i2c.write_byte_data(addr, 0x0f, 0x22) #LED4-R Level 0x22
  else:
    i2c.write_byte_data(addr, 0x0f, 0x00) #LED4-R Level 0x00(Off)

  time.sleep(1)

  count = count + 1
  print(count)

  if count >= 10:
    break
LED4のRランプを輝度0x22で光らせる・消すを1秒おきに交互に繰り返すことで、点滅を実現している。
実行結果
python3 i2c-led-blink.py

1
2
3
4
5
6
7
8
9
10
全く同じことを、C言語ライブラリを用いても行える。ファイルディスクリプタに命令を書き込むだけ。
| C/C++ | i2c-led-blink.c | GitHub Source |
#include <stdio.h>
#include <string.h>
#include <stdlib.h>
#include <unistd.h>
#include <fcntl.h>
#include <sys/types.h>
#include <sys/stat.h>
#include <sys/ioctl.h>
#include <linux/i2c-dev.h>

int main(int argc, char **argv) {

  int fd, i; unsigned char reg,arg[2];

  if( (fd = open("/dev/i2c-1", O_RDWR )) < 0) {
    fprintf(stderr, "Faild to open /dev/i2c-1 as fd\n");
    return (-1);
  }

  reg = 0x60;

  if(ioctl(fd, I2C_SLAVE, reg) < 0) {
    fprintf(stderr, "Unable to get bus access to talk to slave 0x%02X\n", reg);
    close(fd);
    return (-1);
  }

  arg[0] = 0x00;
  arg[1] = 0x00;

  if(write(fd, arg, 2) != 2) { /* ALL LED INIT */
    fprintf(stderr, "Error writing to i2c slave %02x %02x\n", arg[0], arg[1]);
    close(fd);
    return (-1);
  }

  arg[0] = 0x17;
  arg[1] = 0xff;

  if(write(fd, arg, 2) != 2) { /* LED4 ON */
    fprintf(stderr, "Error writing to i2c slave %02x %02x\n", arg[0], arg[1]);
    close(fd);
    return (-1);
  }

  for(i = 0; i < 10; i++) {
    arg[0] = 0x0f;
    if(i % 2 == 0) {
      arg[1] = 0x22; /* LED4-R Level 0x22 */
    }
    else {
      arg[1] = 0x00; /* LED4-R Level 0x00(Off) */
    }
    if(write(fd, arg, 2) != 2) {
      fprintf(stderr, "Error writing to i2c slave %02x %02x\n", arg[0], arg[1]);
      close(fd);
      return (-1);
    }
    fprintf(stdout, "%d\n", i + 1);
    sleep(1);
  }

  close(fd);

  return 0;
}
コンパイル、実行
gcc i2c-led-blink.c

./a.out

1
2
3
4
5
6
7
8
9
10
※本記事内容の無断転載を禁じます。
ご連絡は以下アドレスまでお願いします★
CUDA13環境下でGPU使用版のllama.cppを導入しC++ライブラリを使う
CUDA13環境下でGPU使用版のllama-cpp-pythonを導入する
CUDA13環境下でGPU使用版のPyTorchを導入する
LetsEncrypt/certbotの証明書自動更新がエラーになる場合
Wav2Lipのオープンソース版を改造して外部から呼べるAPI化する
Wav2Lipのオープンソース版で静止画の口元のみを動かして喋らせる
【iOS】アプリアイコン・ロゴ画像の作成・設定方法
オープンソースリップシンクエンジンSadTalkerをAPI化してアプリから呼ぶ【2】
オープンソースリップシンクエンジンSadTalkerをAPI化してアプリから呼ぶ【1】
CUDA13環境下でGPU使用版のPyTorchを導入する
【Windows10】リモートデスクトップ間のコピー&ペーストができなくなった場合の対処法
【ウマ娘】デイリーレースに雨の状態で出走するには
【Debian】apt updateでCD-ROMがどうのこうの言われエラーになる場合
GitLabにHTTPS経由でリポジトリをクローン&読み書きを行う
PostgreSQLをソースコードからインストールしてsystemdのサービスとして動かす
Windows11+WSL2でUbuntuを使う【2】ブリッジ接続+固定IPの設定
Windows11でMacのキーボードを使うには
【Swift UI】右から登場し右へ消えるアニメーションボタンビュー